Gravity Guitar Picks Tripp Review

Gravity Guitar Picks hails from Manteca, California. They manufacture and sell acrylic guitar picks to guitarists everywhere via their web site, and select dealers around the globe. I classify Gravity’s guitar picks as specimens of the boutique persuasion.

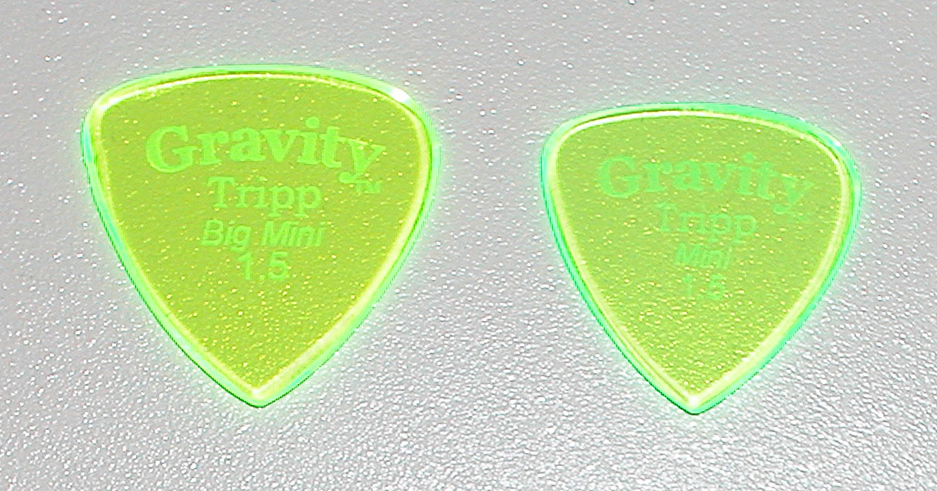
I purchased the Gravity Tripp in the Mini and the Big Mini sizes in the 1.5 mm thickness from Gravity Guitar Picks’ web site. Shipping has been fairly quick for the U.S Mail, in the 4 – 7 day range from California to my Midwest location (I have purchased picks a few different times from Gravity Guitar Picks). I did not expect super fast delivery for the reasonable and affordable $2.99 shipping charge I selected. There is also a 2-3-day Priority shipping option for $6.00 if you need your picks delivered pronto.

Pick Specs:

  • Gauges: 1.5 (Fluorescent Green), 2.0 (Blue), .3.0 (Orange), 4.0 (Yellow), 6.0 mm (Red)
  • Material: Acrylic
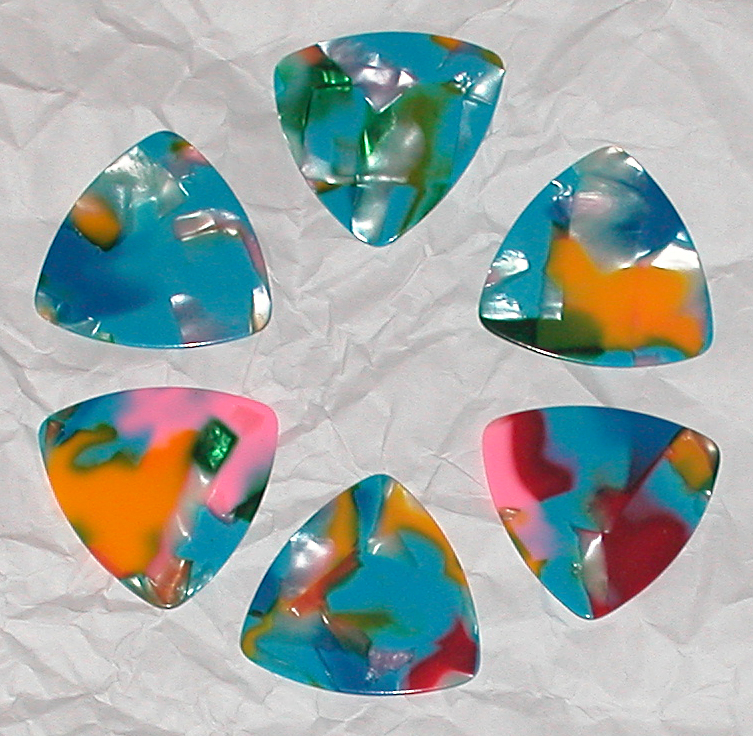
  • Shape: Distorted 351 Shape sort of (please see the featured image at the top of this post)
  • Sizes: Mini (Jazz), Big Mini, Standard and XL
  • Tips: Pointed, Medium Round, and Full Round
  • Bevel: Polished or Master Finish (unpolished)
  • Price: Starting price is $4.99/pick for the 1.5 mm thickness, and goes up from there depending on the options you choose. The picks reviewed currently cost $4.99 each plus shipping.

Description

The Gravity Tripp 1.5 mm guitar pick is manufactured from transparent acrylic (Polymethyl Methacrylate to be exact) that is tinted fluorescent green in color. These picks really jump out at you and catch the eye. The picks actually look like they are glowing in the fluorescent green color. Each of the three tips is a different shape. It is like getting three different picks for the price of one. Sweet! You can cover a lot of sonic ground with the Gravity Tripp. Both picks reviewed have polished bevels, and the bevels are identical on both the Mini and the Big Mini sizes.

Action

With a thickness of 1.5 mm each these picks are fairly stiff and do not flex much in actual use. The pointed tips on the two Tripp models allow for good clean alternate picking that feels almost effortless, and allows for faster playing styles. The medium round tip is similar to the tip of a Fender model 351 type pick. This tip is good for playing chords and picking single note lines but requires more work than the pointed tip when picking notes. The full round tip I found to work best for strumming chords. You can use the full round tip for picking single notes, but there was too much pick on the strings for my taste most of the time.

Sound

The Tripp Mini has a smaller sound and the tone is bit blurred due to your index finger hitting the string as you strum and pick notes, which is typical of a Jazz sized pick. The Tripp Big Mini has a bigger, clearer sound with a lot more volume on tap.

Here’s a rundown of how each pick tip sounds.

• Pointed tip: This tip has the thinnest sound of the three tips, but has a more focused sound with excellent articulation.

• Medium Round tip: This one has a fuller sound with good attack, and good articulation.

• Full Round tip: This tip gives you an even fatter tone, which I found great when strumming power chords. When looking for a more rounded tone this is the tip to use when picking single notes.

I have found the tone of this pick to be fairly neutral. Not too bright, and not too dark.

Summary

The Tripp guitar pick is one of my favorites of Gravity Guitar Picks’ line due to the versatility of three different tips in one pick.

Keep pickin’!


Stringjoy POM Guitar Pick Sampler

Yesterday my latest order from Stringjoy came in. In that order I had ordered Stringjoy’s guitar pick sampler pack. Seven picks, one of each gauge/thickness, for $7. I expected them to come in a small plastic bag, but I was pleasantly surprised that they were packaged in a cool little circular tin with a screw-off lid. Nice touch Stringjoy!

I’ll test the guitar picks out over the next few weeks and will post a review later.

Have a great weekend, and keep pickin’!

Gravity Guitar Picks Stealth

Gravity Guitar Picks Stealth Review

Gravity Guitar Picks hails from Manteca, California. They manufacture and sell acrylic guitar picks to guitarists everywhere through their web site, and select dealers around the globe. I classify Gravity’s guitar picks as specimens of the boutique ilk.

I purchased the Gravity Stealth in the Mini and the Big Mini sizes both with an oval grip hole in the 2.0 mm thickness from Gravity Guitar Picks’ web site. Shipping has been fairly quick for the U.S Mail, in the 4 – 7 day range from California to my Midwest location (I have purchased picks a few different times from Gravity Guitar Picks). I did not expect super fast delivery for the reasonable and affordable $2.99 shipping charge I selected. There is also a 2-day Priority shipping option for $10.00 if you need your picks delivered sooner.

Pick Specs:

  • Gauges: 1.5 (Fluorescent Green), 2.0 (Blue), .3.0 (Orange), 4.0 (Yellow), 6.0 mm (Red)
  • Material: Acrylic
  • Shape: Rounded Triangle with Oval Grip Hole
  • Sizes: Mini (Jazz), Big Mini, Standard and XL
  • Tips: Pointed
  • Bevel: Polished or Master Finish (unpolished)
  • Price: Starting price is $4.99/pick for the 1.5 mm thickness, and goes up from there depending on the options you choose. The picks reviewed currently cost $6.99 each.

Description

The Gravity Stealth 2.0 mm guitar pick is manufactured from transparent acrylic (Polymethyl Methacrylate to be exact) that is tinted blue in color, and has three identical pointed tips to pick with. It is like getting three picks for the price of one. Bonus! The oval grip hole makes it easier to hold onto the pick especially in the Mini size. Regarding the Big Mini size, the oval grip hole is okay, but a series of holes drilled into the pick in a circular fashion would work better in my opinion for a more comfortable grip on the pick. Both picks reviewed have polished bevels, but the bevels are not the same on the two sizes. The Stealth Mini’s bevels span further across the the three tips with more of an angle than the bevels do for the Big Mini size that I received. I was a bit disappointed since I like the bevel on the Stealth Mini better than on the Stealth Big Mini for fast playing and tremolo picking. To be fair I ordered the Stealth Mini at an earlier date, and ordered the Stealth Big Mini when Gravity had the Stealth picks on sale at a later date, so they were not both manufactured at the same time or shipped in the same order. Perhaps Gravity decided to change how they beveled the Stealth over the month or two time frame.

Action

With a thickness of 2.0 mm each these picks are very stiff and do not bend at all in actual use.The relatively pointed tips on the two Stealth models allow for good clean alternate picking (The Stealth Mini has slightly more rounded tips than the Stealth Big Mini) . The bevel on the Mini allows for slightly better string release when picking single note lines and when tremolo picking. The Big Mini tends to work better for chord work than the Mini. Both picks glide over the strings fairly easily.

Sound

The Stealth Mini has a smaller sound and the tone is bit blurred due to your index finger hitting the string as you strum and pick notes, which is typical of a Jazz sized pick. The Stealth Big Mini has a larger, clearer, more focused sound than the Stealth Mini due to the added size and mass of the pick, and the more pointed tips. Plus there is a enough pick real estate in the Big Mini size for the index finger to not hit the string(s) when you strum and pick if you don’t want it to. This gives you a clearer sound with less blur/warmth. There are pluses and minuses for either pick depending on your preferences.

Summary

It is interesting how two picks made from the same material, and relative shape can sound different in actual practice, but they do. The Stealth Mini wins for single note picking speed and warmth. The Stealth Big Mini is the better choice if you are looking for clear note separation, clean articulation, and crisp chordal work. I have found the Stealth to show very little wear from playing, which means you can expect these picks to last you a long time if you don’t lose them first. A very cool bonus feature this model and some of the others that Gravity makes is you can play faster by just using the pick without any additional practice time. Pretty nice benefit if you ask me.

Keep pickin’!


Who Is Your Favorite Guitarist?

Randy Rhoads has been one my faves ever since I first heard the Blizzard of Oz record when it came out in the early 80’s. That album was a game changer for me. I was also lucky enough to see him play live in 1981, which upped the ante on how good he really was. Mind blowing guitar work for the time. Here’s a video I found on YouTube for your enjoyment.

1990 ’76 Reissue Gibson Explorer

I bought this guitar right before Christmas in 1990. Guitar Center had Gibson Explorers and Flying V’s for $350.00. They were also selling Les Paul Studios for $400.00. It was a huge sale! I was surprised the prices were so low for brand new Gibson guitars. The sales manager said they had to blow them out before the New Year. With that in mind I was happy to see if I could find a guitar in their inventory that I liked.

I played a Flying V and it didn’t tickle my fancy. I tried a Les Paul Studio, and thought let’s try an Explorer. I tried three or four Explorers until I hit on one that I really liked. I decided to buy the Explorer with the hardshell case for an extra $100.00. I had the guitar set up by a guitar tech that worked at Guitar Center as an independent contractor, and I was ready to rock!

Features:

  • One-piece solid Mahogany body
  • Mahogany Neck
  • 22-Fret Rosewood Fingerboard
  • Dot inlaid Position Markers
  • 496R neck and 500T bridge pickups
  • Gibson Tune-O-Matic bridge and stopbar
  • Chrome Mini-Grover tuners

The Gibson Explorer just screams Rock ‘n Roll! That is the bottom line on this guitar, and I love it!

The stock pickups are high-output ceramic pickups. Perfect for Heavy Metal, but wait I love to play hard rock, classic rock, and some heavy metal but not exactly what people today consider to be “metal” music. The Gibson 496R pickup in the neck position is a great pickup and sounds really good in this guitar. I tried other pickups in the neck position, and I kept going back to the 496R. The 496R is that good, and definitely a keeper.

The 500T in the bridge position was not working nearly so well for me. The reason is that I like a pickup that cleans up when I roll back the volume on the guitar. The 500T didn’t really do this, because it is super hot at around 15k d.c. resistance. This pickup kept everything way too distorted for my tastes. I searched a long time and tried several different bridge pickups including a Dimarzio Super II, the bridge pickup from my ’76 SG (which sounded pretty good in this guitar), and a couple others. It wasn’t until I acquired my Les Paul Studio with the 498T in the bridge that I knew I probably found the right pickup for the bridge slot in my Explorer. The 498T is a fairly hot Alnico 5 pickup with a d.c. resistance around 13k, but it does clean up when you roll back the guitar volume. With the guitar volume on 10, the 498T will melt your face when playing into an overdriven amp or into a cranked up distortion pedal feeding a clean amp.

The Gibson 498T sells for around $130 new. I decided that was too much money. I knew there was a used guitar shop not too far away, so I went there to find a used 498T. The manager of the store pulls out a couple boxes full of Gibson used pickups. Now to find a 498T… one of the store’s clerks pulls out a multimeter and we start measuring the d.c resistance of each pickup. It took a while but we finally found one that had a d.c. resistance a tad over 12k and was most likely a 498T. I paid the store clerk $50 for the pickup, and I was on my way.

I dropped my “new” used Gibson pickup in the bridge position of my Explorer after removing the chrome cover from the pickup to show the black bobbins like the uncovered 496R that was already in the guitar. I could not be happier. This pickup sounds perfect in the Explorer. Nice and powerful with the guitar volume on 10 and when you roll the volume back it cleans up nicely.

The Gibson Explorer has two volumes and one tone control with a three way pickup selector switch. This allows you to be able to do the pickup selector switch stutter/kill switch trick when you have one of the pickup volume controls turned all the way down.

The scale length is the typical Gibson 24.75 scale length. The neck is a fast 60’s slim taper style neck with a rosewood fretboard. The fretboard has 22 nice medium sized frets. Not too big, not too small.

The paint job was done in Classic White, which has yellowed over the years. Quite typical for white Gibson guitars from my experience.

This particular Gibson Explorer is a blast to play and sounds quite nice. It sits very nice in the mix when recording rhythm parts. Leads sound great with this guitar too. There isn’t much not to like about this guitar except maybe the weight. It is a tad on the heavy side.

Here is a guitar solo I recorded on my iPad using the Explorer into Positive Grid’s JamUp Pro. Post production was done in Logic Studio 8 on my Mac. All of the parts were played with the Explorer if I recall correctly. I know the lead part was for sure the Explorer.

Keep pickin’!


DIY Handmade Embedded Artwork Guitar Picks!

I made the following guitar picks myself. They are one of a kind, handmade guitar picks. The artwork is inside the pick, which means the artwork won’t scratch or wear off. I found the information on how to make these picks from the Pick Punch web site. The How To Make Guitar Picks page specifically.

I purchased a couple of sheets of clear polycarbonate sheeting from pickpunch.com. One sheet is .50 mm in thickness and the other is .80 mm thick. I didn’t use a pick punch to make these, though. I traced the pick shape on the polycarbonate sheets with a fine tip Sharpie marker and cut them out with scissors (I tried an Exacto knife, but the scissors worked much better).

After the rough picks are cut out the artwork is applied next.

Sharpie_Clear

Sharpie_B&P

The artwork in the two finished picks above was created with Sharpie markers.

The artwork in the two picks below was painted with enamel model airplane paint purchased from a local hobby store.

O&B_Paint

Multi_Paint

The artwork is literally inside the pick. The artwork will not rub off on your hands as you play. To accomplish this you use two, three, or more (depending on how thick you want your finished pick to be) pieces of polycarbonate cut out into the rough pick shape you want. Then apply your artwork any way you would like with Sharpie markers, paint, water slide decals, rubber stamps, etc. to only one of the sides if you are using only two pieces of polycarbonate. If you are using three pieces of polycarbonate put the artwork on the piece you plan to put in the middle, and in this case, you can put artwork on both sides if you want. After your artwork has dried you are ready to glue your pick together. Lay the pieces of polycarbonate you plan to glue up on white copier paper or plain old wax paper (I like wax paper better). Then apply super glue to the inside face of one of the pieces if you are using two pieces of polycarbonate, or two interior faces if you are gluing up three pieces of polycarbonate, make sure you are gluing the side or piece with the artwork to the inside to encapsulate the artwork inside the polycarbonate pieces. Make sure you use plenty of super glue. Try to line up the pick pieces as best you can, then squeeze out as many of the air bubbles as possible. Clamp the glued up polycarbonate pieces with a small spring clamp available at any hardware store, and let the whole works dry overnight (if you can’t wait, at least let it dry a few hours before moving onto the next steps).

After the glued-up picks have dried the real work begins… Lots and lots of sanding.

I used a disk sanding wheel with 120 grit sandpaper attached to my hand drill to get the pick shape squared up on the edges. This can be done quite quickly with the disk sander. I sanded off the excess superglue, that gets all over everything during the gluing process, from the two faces of the pick by hand with one piece of sandpaper laid flat on my workbench and a piece of sandpaper wrapped around the handle of a putty knife. That way I could sand off the super glue without taking off too much of the polycarbonate. This way the pick faces would be sanded nice and flat. I used 150, 330, and 400 grit sandpaper to do this.

Then I roughed out the bevels on the pick edges using the disk sanding wheel. Then I did all of the detail sanding work using 330 and 400 grit sandpaper by hand on my workbench. I felt that I had better control that way, and didn’t have to worry about taking off more material than I wanted to. I recently purchased 600 grit sandpaper to hone the bevels on the edges a little better before buffing.

After the pick has had all of its final shapings completed the next step is to buff the guitar pick with a buffing wheel that attaches to my hand drill like the disk sander. The buffing goes pretty quickly. The total time to make one guitar pick like this is about one hour.

The picks made out of two pieces of .80 mm polycarbonate sheeting are right around 1.6 mm thick when finished and the three-piece picks are about 2.0 mm thick when finished. Both pick gauges are very stiff and sound quite good.

The cool thing about this is you can make guitar picks that no one else has and the picks are finished just the way you like them. With a nice bevel on the pick, you end up with a guitar pick that plays really well. They will let you play as fast as you can go.

The following video helped me figure out how to come up with the procedure I used to make my handmade guitar picks.

Keep pickin’!

Mosaic Celluloid

Vintage Japanese Mosaic Celluloid Picks!

I was surfing eBay last week to see what was out there in the vintage celluloid pick market, and saw these mosaic celluloid picks. I love the look and I had to have them.

Celluloid is getting harder and harder to find for pick manufacturing, so I figured I better scoop up what I like before they are all gone… These appear to be the D’Andrea No. 346 shape or the Herco No. 35.

Mosaic celluloid was used for Herco picks by their Japanese manufacturer when their “shell” colored celluloid wasn’t available. Herco later asked their manufacturer not to substitute the assorted color/mosaic celluloid except for their thumb pick. I guess the assorted colors didn’t sell well at the time, with the Herco thumb pick being the exception.

They sound similar to a Fender celluloid pick, but look way cooler. Very Rock and Roll!

Source: Picks! by Will Hoover

Godin LG Signature

Godin LG Signature

I purchased the Godin LG Signature a couple of months after I bought the Godin Solidac. I went to a music store in the area who sold Godin guitars as part of their inventory in their showroom. I wanted to compare the Godin LGX’s piezo bridge to the Solidac’s. The LGX definitely did sound a bit better than the Solidac, and cost over twice as much!

While I was in the store one of the sales guys pointed out that Godin’s new LG Signature just came in and I should check it out. He said the Seymour Duncan pickups in the LG Signature sound really great. I tried the guitar out, and decided they were right. I really liked the guitar. I made a deal with the manager of the store to let me take the LG Signature home to try it with my own rig over the weekend in exchange for a $100 credit card security deposit, which could be applied to the purchase price of the guitar if I decided to buy the guitar, or would be credited back to my account when I brought the guitar back to the store.

The LG Signature specs are listed below.

Specs:
• Mahogany Neck
• Rosewood Fingerboard
• Jumbo Frets
• Black Machines (Satin finish) 18:1 ratio
• Mahogany Body
• Black Schaller Bridge
• 5-way Switch
• Seymour Duncan Humbucker Pickups
• Carved flame maple top
• Colors: Trans Blue, Cognacburst, Trans Black

As you can see from the picture I purchased the LG Signature in Transparent Black with a carved AA flame maple top. The LG Sig is quite pretty in my opinion. The guitar has a tune-o-matic bridge, but instead of having the usual stop tailpiece, the LG Signature features string through the body design where the ball end of the strings are held by a brass plate screwed on to the back of the guitar. This system works quite well coupling the string vibrations to the mahogany body, which adds resonance to the guitar’s sound. The neck is a bolt-on design, but the way Godin does this the guitar plays like a set neck guitar. The scale length is 25.5 inches, which is not what you usually expect with a mahogany guitar with a maple cap, but this gives you a lively playing guitar with good snap. The pickups are a Seymour Duncan Jazz in the neck and a specially wound Custom Custom for Godin in the bridge position, so I guess you could consider the pickup to be a Custom Custom Custom, with nickel pickup covers. There is a five position selector switch, which gives you neck humbucker, neck coil-tapped (for single coil sounds), neck and bridge humbuckers combined, bridge coil-tapped, and bridge humbucker. This affords you a large assortment of tonal options.

The Rosewood fingerboard is attached to a fairly thick mahogany neck (some guys I know had their LG Sig’s neck shaved down, but I kept mine nice and fat for better stability). The nut is a Tusq nut, and the frets are nice jumbo frets that were dressed and finished quite well. The tuners turn smoothly, sporting black tuning knobs, with good tuning stability. There is a master volume and tone control, so the typical dual humbucker pickup selector switch stutter effect is not possible from the stock guitar controls, nor is having different switchable volume and tone settings for the neck and bridge pickups. Most of the hardware on the guitar is black.

Playability and Feel

The Godin LG Signature is a dream to play. It has a very comfortable belly cut on the back of the body, and a nice ergo-cut neck with acceptable access to the upper frets. The pickup selector switch, volume and controls are placed nicely as well.

I set the guitar up for slide guitar playing and/or regular guitar playing without a slide. The strings are set slightly higher on the treble side than in a typical setup. Also due to the higher string tension afforded by the  25.5-inch scale length and the fixed bridge, this guitar is a good candidate for alternate tunings such as tuning a half step down or drop tunings on the low E string, where the strings will tend to get too slack on 24.75-inch scale length guitar, without going to a thicker string gauge. If you go all the way to drop C or drop B I would suggest using heavier gauge strings for better string tension.

Sound

This guitar sounds good through a cleanish amp. It can get close to some nice Strat tones when the neck pickup is coil-tapped. The bridge pickup in split-coil mode is a nice option when you want a brighter tone, that sounds thinner, with slightly less drive than in humbucker mode, but does not get overly ice-picky. The humbucker tones are nice and thick and sound great with some overdrive or distortion. The LG Signature makes for a really nice all around guitar for Pop, Blues, Rock, Country or Jazz. Below is a video of me playing the LG Sig with a band I used to play with covering Alice In Chains, Man In A Box. The recording was done with a small camcorder on a tripod, but this will give you an idea on how she sounds for heavy Rock music. Below the video is a quick sound clip of the Godin LG Sig into my modified Fender Pro Junior.

A video and a sound clip are worth at least a 1,000 words…

If you are interested in purchasing a Godin LG Signature the used market (Ebay, Reverb.com, etc.) is where you would want to look, since the guitar is no longer listed on Godin’s updated web site.

Keep pickin’!


Digitech Metal Master

The Digitech Metal Master… I picked this distortion pedal up used from Guitar Center yesterday. They had it priced to move at $19.99. I have been in the market for a pedal that would give me some high gain tones. I decided to give this pedal a try.

Initial impression is I’m glad I did! The Metal Master has the exact sounds, and then some that I was looking for, to complement my other overdrive and distortion pedals already on my pedalboard. I’ll try the pedal with a couple of the bands I play with to see how this pedal stacks up with the others. That should give me a good picture if the pedal is truly useful in a band setting.

The Metal Master has been sounding real nice during my practice sessions at home. Keep an eye out for the full review coming soon…

Keep pickin’!

V-Picks Euro and Euro II

V-Picks Euro and Euro II Review

I have had some time to use the V-Picks Euro and Euro II, so here we go with the review…

V-Picks is a pick manufacturing company based in Nashville, Tennessee, that produces cast acrylic guitar, mandolin, and bass picks at a starting price point that I would classify as the so called “boutique” level of guitar picks. All of the V-Picks that I have had the pleasure of trying have been very well made, and are nice to look at.

I emailed Vinni Smith, the company’s owner, for some information on how their picks are made and this is what he had to say.

The Euro and Euro II picks are made of cast acrylic. Cut out with a laser machine and then hand buffed on a bench grinder. Then heat treated, heat tempered, and buffed with a flame. A lot of hand work is done as with all of our picks. I designed the Euro for the Jazz III players, so they would have another option. Small, yet a huge tone and fast action. I think much faster action than the Jazz III.

The V-Pick Euro and Euro II are two different sizes, but the same thickness and relative shape. The Euro II is the larger of the two. They are made of clear acrylic with seven holes drilled through the picks. The holes are a feature I really like, as they do help with gripping the pick more securely with your fingers. I did not have any problem with dropping these picks or having them fly out of my fingers while playing.

Euro Pick Specs:

  • Gauge: 1.5 mm (from my measurements the pick I have is a hair thicker than 1.5 mm)
  • Material: Cast Acrylic
  • Dimensions: 15/16″ wide x 1″ long
  • Shape: In-between a Jazz III and a Regular Fender 351 pick
  • Tip: Rounded and Smooth Beveled
  • Price: $4.00 Each

Euro II Pick Specs:

  • Gauge: 1.5 mm
  • Material: Cast Acrylic
  • Dimensions: 1″ wide x 1 1/8″ long
  • Shape: Close to a Regular Fender 351 pick but a tad shorter
  • Tip: Rounded and Smooth Beveled
  • Price: $4.00 Each

I initially chose the Euro and Euro II to try first because I really liked the tone these picks produced (yes other V-Picks do sound different than these) especially when using a clean tone or light overdrive while playing electric guitar.

From my experience the Euro and the Euro II do allow you to play faster cleaner lines without any additional practice than what you can do with your favorite Jazz III pick. Some of you may notice some acrylic pick chirp with these picks, but I found a slight change in picking technique/angle mitigated this issue. Did I mention you can play faster without any additional practice? I did! That should get plenty of people excited about trying these picks just for that added feature alone.

I used both the Euro and Euro II picks for my electric guitar practice at home and in a several band situations for live performance. I found I really liked the big fat tone of the Euro II when I practiced at home, but when playing in a band situation with two electric guitars, acoustic guitar, keyboard, bass and drums I quickly found the Euro II to be too much pick for the job. The sound was too big and thick for what I wanted to hear, so I switched to the smaller Euro V-Pick which gave me the more focused sound I was looking for. It is interesting to find what works at home doesn’t always work with a full band.

I have found V-Picks do not wear down very quickly, so you can plan on using the Euro or Euro II for a long time unless you misplace or lose them.

For playing Jazz music I don’t think there is a better pick out there than the Euro. At least not one that I have tried to date, and I have tried quite a few. For softer rock music the Euro is a good pick as well. For harder rock the Euro II is a good choice if you want a heavy, thick pick attack. For speed picking these picks do well, but I have found some other picks to be better, which I will reveal in forthcoming pick reviews.

Give the Euro and Euro II a try if you currently like the Dunlop Jazz III. You may just find your next favorite pick.

Keep pickin’!